1. Set up clients and client groups
Start in the Voucher Cloud Admin UI. Client groups organize clients (POS terminals, online shops, etc.) and define which scopes are available to them:| Scope | Permission |
|---|---|
read | Read a single voucher |
read-lists | Read voucher lists |
read-secrets | Read voucher code and pin |
use | Activate, reserve, charge, and cancel |
manage | Create and delete vouchers |
update | Update vouchers |
recharge | Recharge a voucher |
2. Get credentials for your client
The Voucher API uses OAuth 2 client credentials. To get aclient_id and client_secret for your client:
- In the Admin UI, click the connect button (wifi icon) for your client. A dialog shows a connection pin valid for 30 minutes.
- Exchange the pin for credentials using the Client connect endpoint:
client_id and client_secret. Store them securely - you will need them to get tokens.
3. Get an access token
Use the client credentials flow against the Voucher API’s own token endpoint:client_type is optional and used for internal statistics only (max 32 chars).
The response is a standard OAuth 2 access token. Pass it in every subsequent request as a Bearer token:
The Voucher API has its own OAuth 2 server. Tokens from the JTL platform or ERP API are not valid here.
4. Create a voucher
id and code from the response - you will need them in the next steps.
5. Activate the voucher
Vouchers are created with statusinactive by default. An inactive voucher cannot be charged. Activate it after payment:
6. Reserve and charge
Charging a voucher is a two-step process: first reserve an amount (locks the voucher and confirms sufficient balance), then charge it (executes the deduction).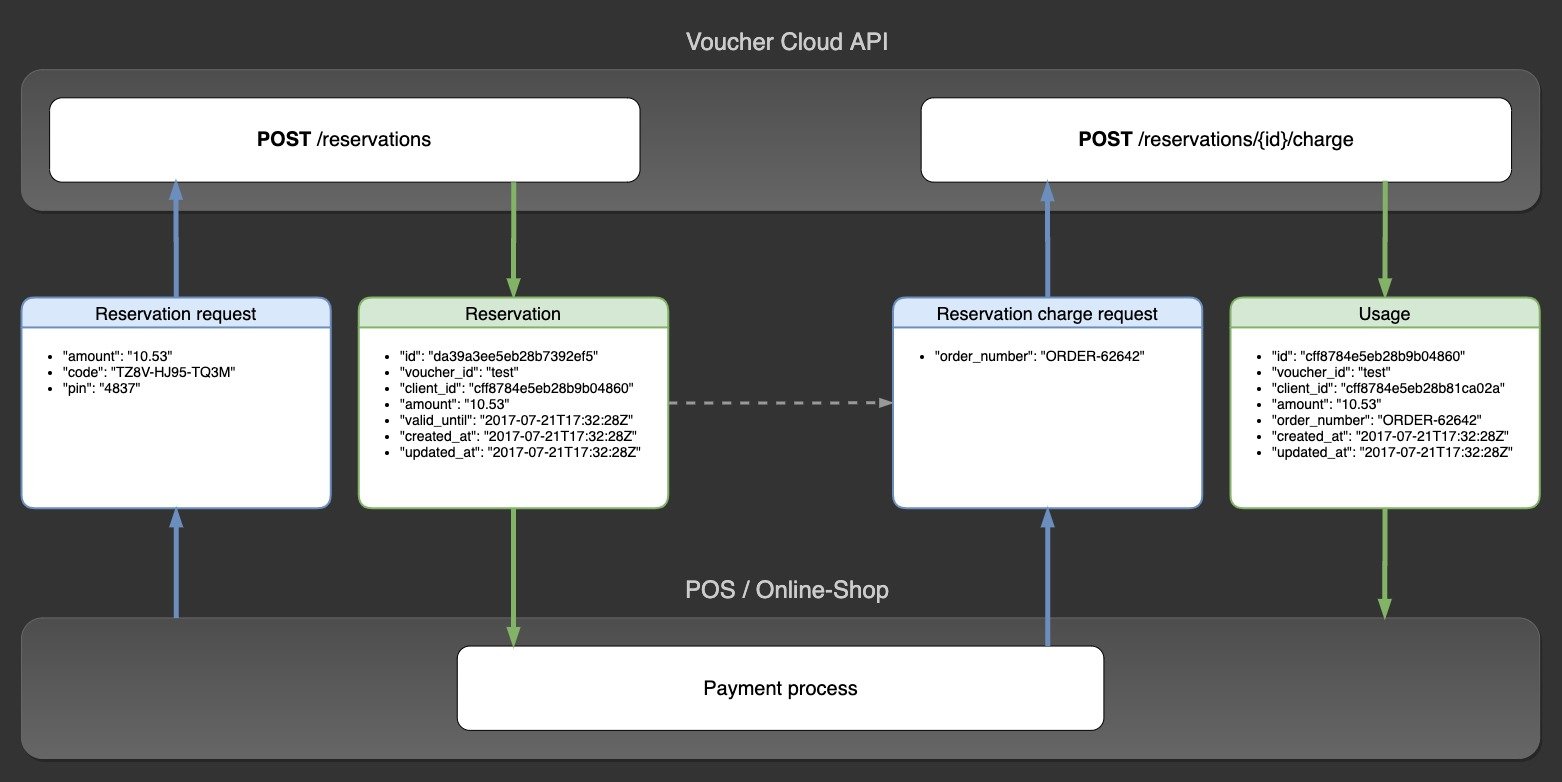
6.1 Create a reservation
id from the response.
A reservation expires after 30 minutes, or when a new reservation is created for the same voucher.
6.2 Charge the reservation
id of the resulting charge object.
7. Refund a charge
If a customer returns goods, refund the charge:type: refund.
8. Recharge a voucher
Add credit to an existing voucher (for bonus card or store credit use cases):type: recharge.
From here, explore the full API reference for all available endpoints and parameters.